Part 1 : Brainstorm
I was looking for an effective way to teach how a CPU work to bunch of AL students.
The kids were seriously bored studying the history of computers, NBF form, system flow chart diagrams that still talk about punch card readers, Von Neumann architecture, CPU flags and the various address modes such as direct, indirect, index addressing!
These “boring topics” were taking the fun out of their computer period.
That’s when it stuck me, why can’t I introduce them to Arduino! perhaps make something interesting with it. The kids jumped at the idea. Since their science day competition is coming in 2 months, we decided on building a robot with Arduino as the brains. I thought this to be a great opportunity to learn the theory by actually using a CPU.
I introduced them to the world of micro-controllers. They heard of sensors and actuators but have never seen any in real life !
Here’s a good video explaining the Arduino board:
We watched a lot of videos online and googled to look at what others have done. Two ideas emerged at the end of the day:
- Build a line following robot
- Build a robot that can draw with LOGO commands
More votes were in favour of the line follower.
So what is a robot?
Well it is a system that contains sensors, control systems, manipulators, power supplies and software all working together to perform a task. Designing, building, programming and testing a robots is a combination of physics, mechanical engineering, electrical engineering, structural engineering, mathematics and computing.
A study of robotics means that students are actively engaged with all of these disciplines in a deeply problem-posing problem-solving environment.
Our first job was to identify the different tasks and then assign people to it. So this was our list:
- Team leader – Samith
- Log book maintenance – Vinura
- Treasurer – Samith
- Body & board construction, tool supply – Samith, Lakith, Janidu
- Code for sensors (lights, bump) – Mewantha, Vinura, Santhush
- Code for Actuators (motors, lights) – Mewantha, Vinura
- Other software – Sanjey, Rahul, Mewantha, Vinura, Santhush
Next we decided to look at the parts required and the availability of the same in Sri Lanka. Although we could order many parts from the internet, that would take a long time, especially during the x’mas season.
I decided to call one of my old friends, Thisara at Lankatronics. They seems to have everything we needed. We came up with this rough list of components.
- Lakduino Uno v4
- DC gear motor with wheel – 2 pieces
- Arduino official motor driver shied
- 16×2 LCD display
- Optical reflective sensors
Since the official motor driver shield was out of stock we ended up buying few L293 chips. We will build our own driver board.
We purchased the small components such as resistors, vero board etc… from 1st cross street, Pettah, and the acrylic (plastic) sheet, necessary for the body construction from Jeewa Plastic.
References:
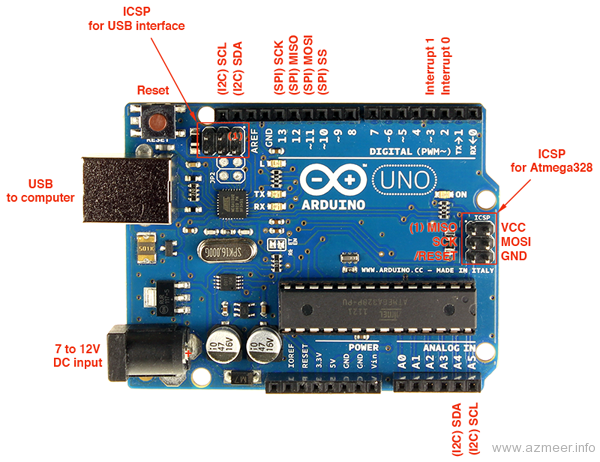
The Arduino Uno pin-out diagram
- The compatible Lakduino has its own website here: http://www.lakduino.com/
- Electronic components: Unitech Trading, #15, 1st Cross Street, Colombo 11 (Tel: 2334100, 2395847, 4736590), Millennium Electronics, #5, 1st Cross Street, Colombo 11 (Tel: 2440133/4)
- Jeewa Plastic, Darley road, Maradana.
- Basic connections
- My reference when it comes to Arduino ‘Bots
- Another gem from Apress – Learning electronics with Arduino
- Lynda.com even has a full course
Some places to purchase electronic items:
- Vicram Plaza No 51 1st Cross Street pettah. (lot of shops with lot of items)
- Asia electronics, 1st cross street pettah
- Sena electronics, 1st Cross Street
- YMBA Borella, Senith electronics
- Kumarasinghe Radio
I will be posting the progress here. Please check back.
- Part 1: Introduction
- Part 2: Body construction
- Part 3: Optical sensor board
- Part 4: Motor driver board
- Part 5: LCD display


